
Neural Search 101: A Complete Guide and Step-by-Step Tutorial
Andrey Vasnetsov and Manas Chopra
·August 01, 2026

Information retrieval technology is one of the main technologies that enabled the modern Internet to exist. These days, search technology is the heart of a variety of applications. From web-pages search to product recommendations. For many years, this technology didn’t get much change until neural networks came into play.
In this guide we are going to find answers to these questions:
- What is the difference between regular and neural search?
- What neural networks could be used for search?
- In what tasks is neural network search useful?
- How to build and deploy own neural search service step-by-step?
What is neural search?
A regular full-text search, such as Google’s, consists of searching for keywords inside a document. For this reason, the algorithm can not take into account the real meaning of the query and documents. Many documents that might be of interest to the user are not found because they use different wording.
Neural search tries to solve exactly this problem - it attempts to enable searches not by keywords but by meaning. To achieve this, the search works in 2 steps. In the first step, a specially trained neural network encoder converts the query and the searched objects into a vector representation called embeddings. The encoder must be trained so that similar objects, such as texts with the same meaning or alike pictures get a close vector representation.
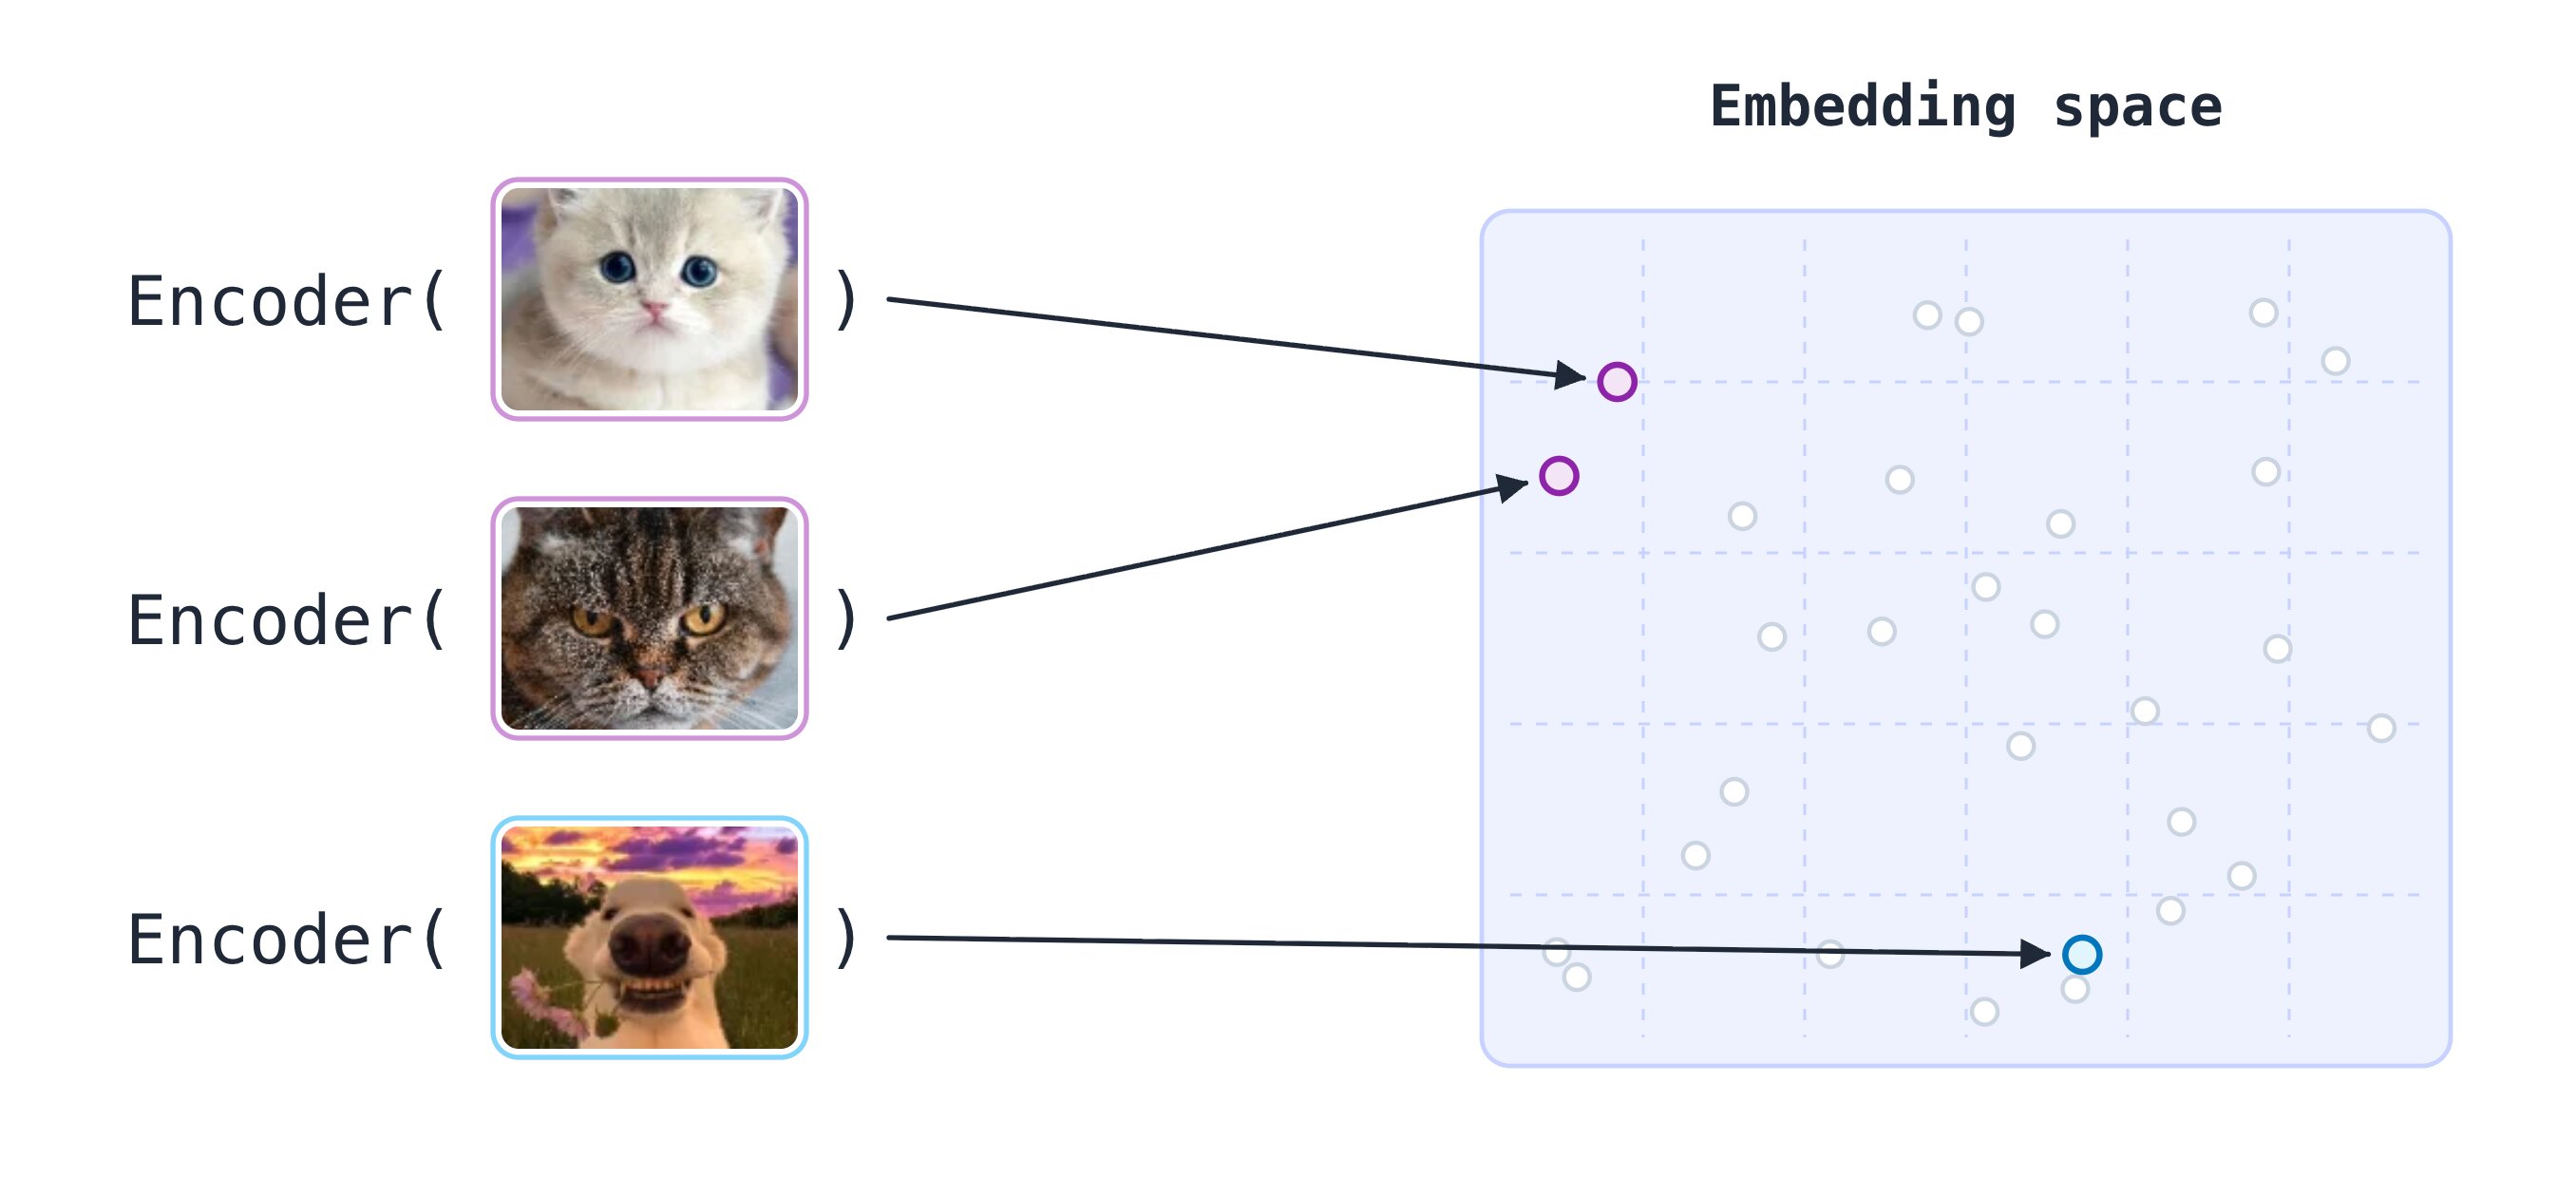
Having this vector representation, it is easy to understand what the second step should be. To find documents similar to the query you now just need to find the nearest vectors. The most convenient way to determine the distance between two vectors is to calculate the cosine distance. The usual Euclidean distance can also be used, but it is not so efficient due to the curse of dimensionality.
Which model could be used?
It is ideal to use a model specially trained to determine the closeness of meanings. For example, models trained on Semantic Textual Similarity (STS) datasets. Current state-of-the-art models can be found on this leaderboard.
However, not only specially trained models can be used. If the model is trained on a large enough dataset, its internal features can work as embeddings too. So, for instance, you can take any pre-trained on ImageNet model and cut off the last layer from it. In the penultimate layer of the neural network, as a rule, the highest-level features are formed, which, however, do not correspond to specific classes. The output of this layer can be used as an embedding.
What tasks is neural search good for?
Neural search has the greatest advantage in areas where the query cannot be formulated precisely. Querying a table in an SQL database is not the best place for neural search.
On the contrary, if the query itself is fuzzy, or it cannot be formulated as a set of conditions - neural search can help you. If the search query is a picture, sound file or long text, neural network search is almost the only option.
If you want to build a recommendation system, the neural approach can also be useful. The user’s actions can be encoded in vector space in the same way as a picture or text. And having those vectors, it is possible to find semantically similar users and determine the next probable user actions.
Step-by-step neural search tutorial using Qdrant
With all that said, let’s make our neural network search. As an example, I decided to make a search for startups by their description. In this demo, we will see the cases when text search works better and the cases when neural network search works better.
I will use data from startups-list.com. Each record contains the name, a paragraph describing the company, the location and a picture. Raw parsed data can be found at this link.
You can follow along with this tutorial in a ready-to-run notebook:

Step 1: Prepare data for neural search
To be able to search for our descriptions in vector space, we must get vectors first. We need to encode the descriptions into a vector representation. As the descriptions are textual data, we can use a pre-trained language model. As mentioned above, for the task of text search there is a whole set of pre-trained models specifically tuned for semantic similarity.
We will use FastEmbed, a lightweight, CPU-first embedding library maintained by Qdrant. FastEmbed ships as an optional dependency of the Qdrant client, so there is no separate encoding step to run ahead of time: text gets embedded automatically the moment it is uploaded to, or queried from, Qdrant.
We will use a model called sentence-transformers/all-MiniLM-L6-v2.
This model is an all-round model tuned for many use-cases. Trained on a large and diverse dataset of over 1 billion training pairs.
It is optimized for low memory consumption and fast inference.
Step 2: Incorporate a Vector search engine
Now that we know how we are going to turn our records into vectors, we need somewhere to store them. In addition to storing, we may also need to add or delete a vector, save additional information with the vector. And most importantly, we need a way to search for the nearest vectors.
The vector search engine can take care of all these tasks. It provides a convenient API for searching and managing vectors. In our tutorial, we will use Qdrant vector search engine vector search engine. It not only supports all necessary operations with vectors but also allows you to store additional payload along with vectors and use it to perform filtering of the search result. Qdrant has a client for Python and also defines the API schema if you need to use it from other languages.
You have two easy ways to get a Qdrant instance running. In this tutorial, we’ll use Qdrant Cloud:
Create a free cluster at cloud.qdrant.io and grab its URL and an API key from the cluster dashboard.
Prefer to run Qdrant on your own machine instead? Pull the pre-built image:
docker pull qdrant/qdrant
And start it locally:
docker run -p 6333:6333 \
    -v $(pwd)/qdrant_storage:/qdrant/storage \
    qdrant/qdrant
Test it by opening http://localhost:6333/ in your browser - you should see the Qdrant version info. All uploaded data is saved into the ./qdrant_storage directory and persists even if you recreate the container.
Either way, once you have a URL (and an API key, for Cloud), configure them so the rest of the tutorial can reuse them:
QDRANT_URL = "https://xxxxxx-xxxx-xxxx-xxxx-xxxxxxxxxxxx.us-east.aws.cloud.qdrant.io:6333"  # or "http://localhost:6333" for a local instance
QDRANT_API_KEY = "<your-api-key>"  # or None for a local instance
Step 3: Upload data to Qdrant
Now that the search engine is running, we can start uploading the data.
To interact with Qdrant from python, I recommend using an out-of-the-box client library, installed with the fastembed extra so that text can be embedded automatically.
To install it, use the following command
pip install "qdrant-client[fastembed]>=1.14.2"
At this point, we should have startup records in file startups.json and a running Qdrant instance.
Let’s write a script to upload all startup data into the search engine.
First, let’s create a client object for Qdrant.
# Import client library
from qdrant_client import QdrantClient, models

qdrant_client = QdrantClient(url=QDRANT_URL, api_key=QDRANT_API_KEY)
Qdrant allows you to combine vectors of the same purpose into collections. Many independent vector collections can exist on one service at the same time.
Let’s create a new collection for our startup vectors.
model_name = "sentence-transformers/all-MiniLM-L6-v2"

if not qdrant_client.collection_exists('startups'):
    qdrant_client.create_collection(
        collection_name='startups',
        vectors_config=models.VectorParams(
            size=qdrant_client.get_embedding_size(model_name),
            distance=models.Distance.COSINE,
        ),
    )
The size parameter is very important.
It tells the service the size of the vectors in that collection.
All vectors in a collection must have the same size, otherwise, it is impossible to calculate the distance between them.
384 is the output dimensionality of the encoder we are using.
The distance parameter allows specifying the function used to measure the distance between two points.
The Qdrant client library defines a special function that allows you to load datasets into the service. However, since there may be too much data to fit a single computer memory, the function takes an iterator over the data as input.
Let’s create an iterator over the startup data, wrapping each description in a models.Document so that Qdrant knows to embed it with FastEmbed on the fly.
import json

fd = open('./startups.json')

payload = []
vectors = []

for line in fd:
    obj = json.loads(line)
    payload.append(obj)
    vectors.append(models.Document(text=obj["description"], model=model_name))
And the final step - data uploading. Encoding now happens automatically as part of the upload, so there is no separate step to compute and save vectors upfront.
qdrant_client.upload_collection(
    collection_name='startups',
    vectors=vectors,
    payload=payload,
    ids=None,  # Vector ids will be assigned automatically
    batch_size=256  # How many vectors will be uploaded in a single request?
)
Now we have vectors uploaded to the vector search engine. In the next step, we will learn how to actually search for the closest vectors.
Step 4: Make a search API
Now that all the preparations are complete, let’s start building a neural search class.
In order to process incoming requests neural search will need 2 things: the Qdrant client, to perform search queries, and the name of the model to embed the query text with. Since we already installed qdrant-client[fastembed] in the previous step, there is nothing extra to install here.
# File: neural_searcher.py

from qdrant_client import QdrantClient, models


class NeuralSearcher:

    def __init__(self, collection_name):
        self.collection_name = collection_name
        self.model_name = "sentence-transformers/all-MiniLM-L6-v2"
        # initialize Qdrant client
        self.qdrant_client = QdrantClient(url=QDRANT_URL, api_key=QDRANT_API_KEY)
The search function looks as simple as possible:
    def search(self, text: str):
        # Use `models.Document` so Qdrant embeds the query with FastEmbed,
        # using the same model that was used to embed the uploaded data
        search_result = self.qdrant_client.query_points(
            collection_name=self.collection_name,
            query=models.Document(text=text, model=self.model_name),
            query_filter=None,  # We don't want any filters for now
            limit=5  # 5 the most closest results is enough
        ).points
        # `search_result` contains found vector ids with similarity scores along with the stored payload
        # In this function we are interested in payload only
        payloads = [hit.payload for hit in search_result]
        return payloads
With Qdrant it is also feasible to add some conditions to the search. For example, if we wanted to search for startups in a certain city, the search query could look like this:
Qdrant requires a payload index on any field you want to filter by - it’s what makes filtering fast instead of scanning every point. Since city isn’t indexed yet, create a keyword index for it first (only needs to be done once per collection):
qdrant_client.create_payload_index(
    collection_name='startups',
    field_name="city",
    field_schema=models.PayloadSchemaType.KEYWORD,
)

    ...

    city_of_interest = "Berlin"

    # Define a filter for cities
    city_filter = models.Filter(
        must=[
            models.FieldCondition(
                key="city",  # We store city information in a field of the same name
                match=models.MatchValue(value=city_of_interest),  # This condition checks if payload field has the requested value
            )
        ]
    )

    search_result = self.qdrant_client.query_points(
        collection_name=self.collection_name,
        query=models.Document(text=text, model=self.model_name),
        query_filter=city_filter,
        limit=5
    ).points
    ...
We now have a class for making neural search queries. Let’s wrap it up into a service.
Step 5: Deploy as a service
To build the service we will use the FastAPI framework. It is super easy to use and requires minimal code writing.
To install it, use the command
pip install fastapi uvicorn
Our service will have only one API endpoint and will look like this:
# File: service.py

from fastapi import FastAPI

# That is the file where NeuralSearcher is stored
from neural_searcher import NeuralSearcher

app = FastAPI()

# Create an instance of the neural searcher
neural_searcher = NeuralSearcher(collection_name='startups')

@app.get("/api/search")
def search_startup(q: str):
    return {
        "result": neural_searcher.search(text=q)
    }


if __name__ == "__main__":
    import uvicorn
    uvicorn.run(app, host="0.0.0.0", port=8000)
Now, if you run the service with
python service.py
and open your browser at http://localhost:8000/docs , you should be able to see a debug interface for your service.

Feel free to play around with it, make queries and check out the results. This concludes the tutorial.
Experience Neural Search With Qdrant’s Free Demo
Excited to see neural search in action? Take the next step and book a free demo with Qdrant! Experience firsthand how this cutting-edge technology can transform your search capabilities.
Our demo will help you grow intuition for cases when the neural search is useful. The demo contains a switch that selects between neural and full-text searches. You can turn neural search on and off to compare the result with regular full-text search. Try to use a startup description to find similar ones.
Join our Discord community, where we talk about vector search and similarity learning, and publish other examples of neural networks and neural search applications.